Table of Contents
Last update on
File Transfer Protocol (FTP) is a way to transfer files between your computer and a web server using software such as with WordPress’ famous five-minute install.
SSH File Transfer Protocol (SFTP) is essentially the same as FTP except that it uses an encrypted connection through an SSL certificate to create a secure connection for transferring files.
Using SFTP instead of FTP is now best practise as a result, though, it’s still fairly common to refer to it as FTP with SFTP being the implied meaning.
While you may not always need to use SFTP to manage a WordPress website, you may find that sometimes it’s needed so you can make essential edits like updating file permissions.
So, here’s how to use FTP with WordPress including how to find your FTP credentials, create an FTP account, and transfer files using an FTP client to manage your WordPress site.
How to Use FTP: Install an FTP Client
To transfer files to and from your server, you first need to install an FTP client onto your computer. There are a number of different and reliable clients available that you can use. It all comes down to your operating system and which one you’re most comfortable using.
Here are some of the most popular FTP clients you can install:
- FileZilla – Free and open source for all platforms. FileZilla is definitely the most popular solution.
- SmartFTP – An FTP client for Windows only. It’s also has a premium price tag of $699 for a license of one to 30 computers, though, there’s a free trial available.
- WinSCP – It’s free and open source, but only for Windows.
- Macfusion – This is a free FTP client for Mac only and you also need Google’s MacFUSE installed to use it.
- LFTP – This is a free FTP client for Linux systems.
- Core FTP – Another free FTP client, but for Windows only. There’s also a premium version with more features.
- Transmit – It’s a premium option for Mac at $45.
When you have one installed, it’s time to fire it up and enter your server’s details. But, there are some details you need to find to do it.
How to Use FTP: Finding Your FTP Credentials
No matter which FTP client you use, you need two things: Your server’s IP address, and an FTP account. When you find these credentials, make a note of them for later use with your FTP client.
By default, many hosts automatically have an FTP account created for you. If you don’t have one, you can create one.
It may also be important to note that each hosting company is a bit different so if your server doesn’t have cPanel installed, ask your host where you can find these details since they’ll be able to provide you with the best answer.
Finding Your Server’s IP Address
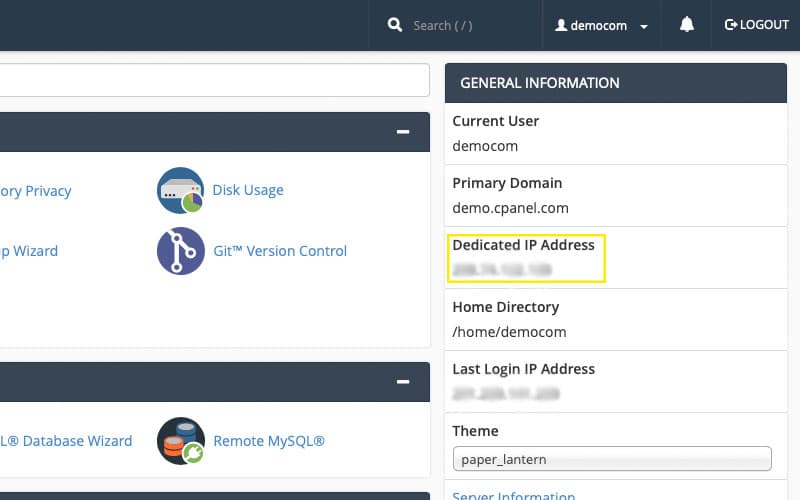
After logging into cPanel, you can find your IP address listed on the right-hand side.
Finding Your FTP Credentials
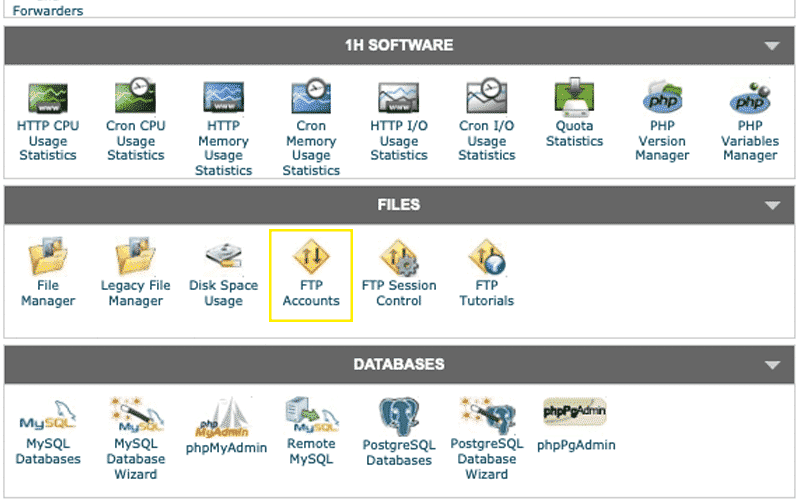
To find your FTP account credentials stay in cPanel and click on Files > FTP Accounts.
If you already have an account, the username will be listed under the FTP Accounts section.
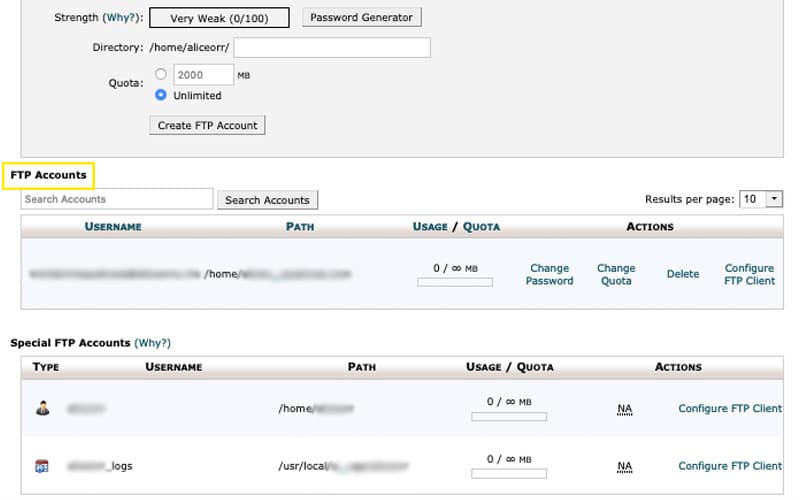
If you do, you can use that account and the username and password to transfer files using an FTP client.
You can also change your password or create a new account if you forget your login details.
Creating a New FTP Account
If you don’t have an FTP account on the list, you can create one.
On the same Files > FTP Accounts page, enter your desired username, password and be sure to select the correct directory.
This is particularly important if your goal is to transfer files to install WordPress in a directory or in the root of your server, for example.
You can select a specific directory as well if you only want to add files to one folder. But, you can still select that folder through your FTP client. So, it’s not entirely necessary to be specific in this Directory field.
You can also select the Unlimited radio button under Quota to ensure you can transfer all the files you need without being interrupted.
Keep in mind that the number of files you transfer is counted against your hosting plan’s bandwidth transfer limit. Reaching this limit means your hosting provider could shut down your site until you upgrade or until the next pay period starts.
With that in mind, you can choose to enter an amount in megabytes under Quota instead of Unlimited.
It’s also crucial you enter a strong password to help ensure the security of your server.
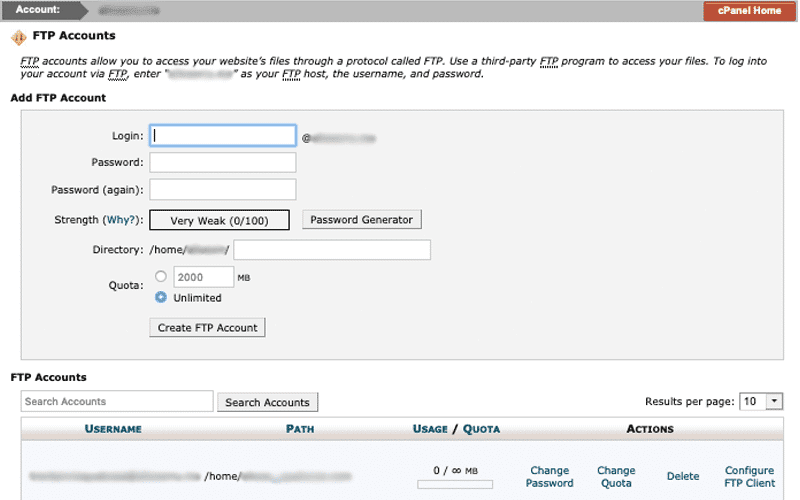
When you’re done, click the Create FTP Account button at the bottom of the form.
Once that’s done, you’re ready to open your FTP client and transfer files there.
How to Use FTP: Entering Your Credentials
For the purpose of this tutorial and to help demonstrate how to use FTP with WordPress, the FileZilla FTP client will be used. It’s also assumed that you have an SSL certificate installed on your domain to use SFTP.
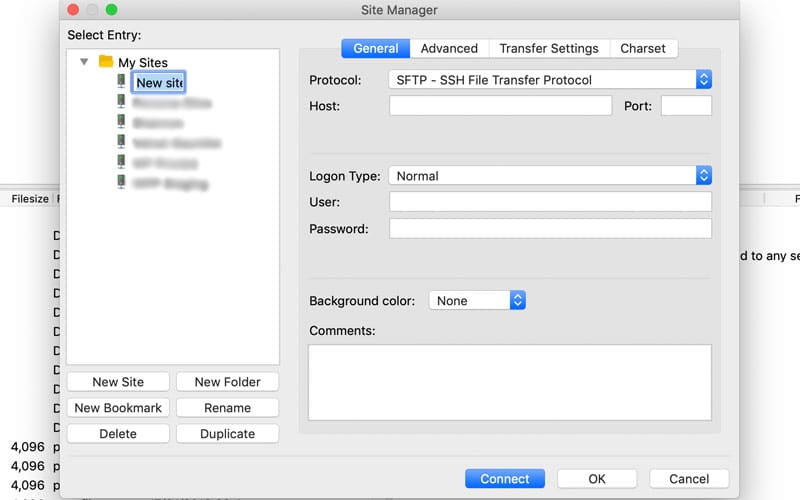
After loading it on your computer, go to File > Site Manager and click the New Site button toward the bottom left-hand side.
By default, the “New site” name is chosen. Type a name that accurately reflects your site and press enter (or return) on your keyboard.
Next, select SFTP – SSH File Transfer Protocol from the Protocol drop down box.
Then, enter in your IP address you retrieved earlier in the Host field.
In the Port field, enter the number 21. This is the default port number and it’s typically fine to use for most purposes. If it results in an error, ask your host which port to use.
Next, add the username and password you found or created earlier on cPanel’s FTP Accounts page. Be sure to enter the full listed username.
For example, add “user@your-site.com” if that’s what’s listed.
When all that’s done, you can click Connect or OK at the bottom of the pop-up. If you want to transfer files now, click Connect.
If all goes well, you should see text appear conveying a successful connection in the first message area below all the buttons of the client.
If you run into issues with using SFTP, it may be because there’s an issue with your SSL certificate, or you don’t have one installed. You may need to renew or install an SSL certificate.
For details, check out How to Get and Install an SSL Certificate for HTTPS ASAP.
How to Use FTP with WordPress to Transfer Files
Now that you’re connected, you’re ready to transfer files. This is also the fourth step for installing WordPress. But, knowing the FTP client’s layout is essential to know how to use FTP with WordPress to transfer files.
There are several different areas in FileZilla. On the left there’s the Local site section and Remote Site on the right.
The first box under the message area displays your computer’s files and folders. Clicking them populates the box underneath it with all the files in the folder you clicked on.
Similarly, the remote site box directly to its right shows the folders on your server. Clicking on them populates the area below it with the files inside that folder.
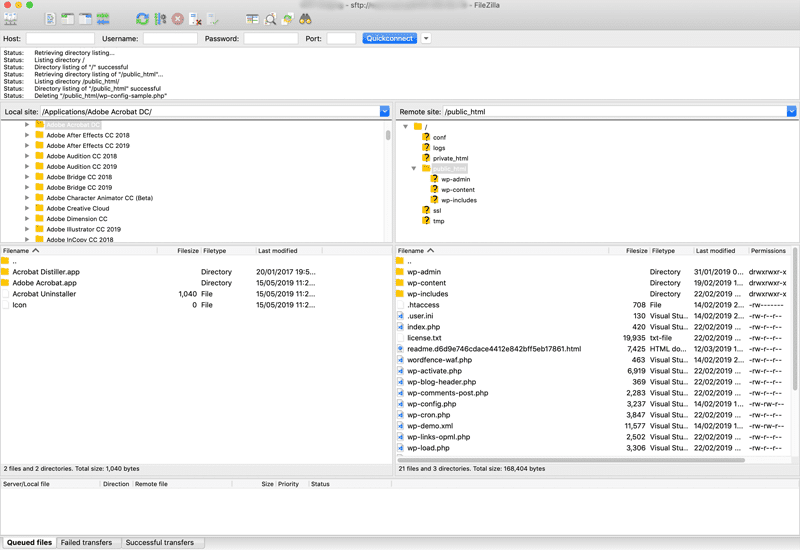
At the bottom, there’s the transfer queue with the status of your pending transfers.
To start transferring files and folders, select (or multi-select) the files and folders from your computer on the left. Then click, drag and drop them to the remote site section on the right.
You can also do the reverse to transfer files from your server to your computer.

On the bottom of the client, there are also a few tabs: Queued files, Failed transfers, and Successful transfers.
The first tab is the default and shows current processes. The Successful transfers tab displays all your files and folders that were completed. The Failed transfers tab shows a list of all files and folders that failed to transfer.
You can place failed files and folders back in the queue by clicking the Failed transfers tab. For Windows, right-clicking on a file name. Or for Mac, click and press the command key. Then, select the Reset and requeue all option.
Once all your files and folders have successfully transferred, you’re done.
Bulk Uploading WordPress Media Files with FTP
It may be important to note that any files you transfer to the WordPress uploads folder through FTP don’t show up in your media folder because they aren’t registered. That means that WordPress doesn’t recognize them.
Fortunately, you can use the Media from FTP plugin.
Alternatively, you can use the Add from Server plugin, but it’s no longer supported even though it still works. Still, be sure to use it with caution.
How to Use FTP: Deleting FTP Your Account
Once you’re done transferring the files and folders you need, it’s imperative that you delete your FTP account. If you decide to keep it, hackers could potentially gain access to your entire site to upload, save, and delete whatever they want.
While some hosts automatically delete FTP accounts after a certain period of time, it’s best not to risk it and delete the account yourself.
To do this in cPanel, go to Files > FTP Accounts. Click the Delete link next to your listed FTP account.
Then, select either the Delete Account button to delete your FTP account and keep your files, or click the Delete Account and Files button to delete both your account and files.
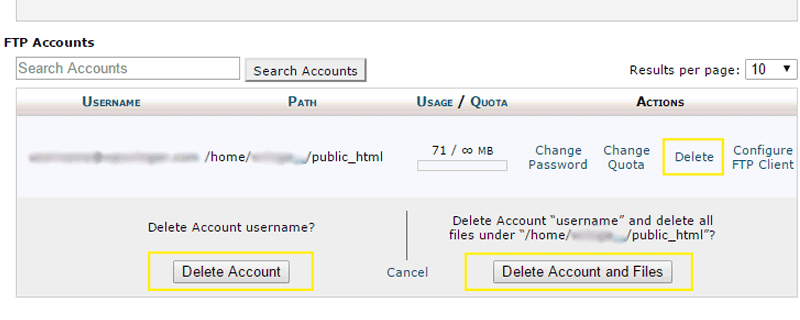
If you choose the latter option, you may also be deleting your site if it’s also in that directory so if you’re not sure, choose the former option.
When you need to transfer files again, create a new FTP account, and delete it when you’re done.
How to Use FTP with WordPress: Transfer Complete
When it comes to knowing how to use FTP with WordPress, you’re all set. You now know how to transfer files to and from your server so you can manually install WordPress, edit file permissions, and complete whatever other file transferring you need.
Do you now know how to use FTP with WordPress, or is there something missing? What FTP client is your favorite? Share your experience in the comments below.


