Table of Contents
Last update on
Are you experiencing a slow WordPress site? Too many HTTP requests could be the source of the problem. Reducing your site’s page load time by making fewer HTTP requests improves how quickly users can access that content and impacts their overall web browsing experiences. Page loading speeds matter, and it directly affects how users feel about using an app or website.
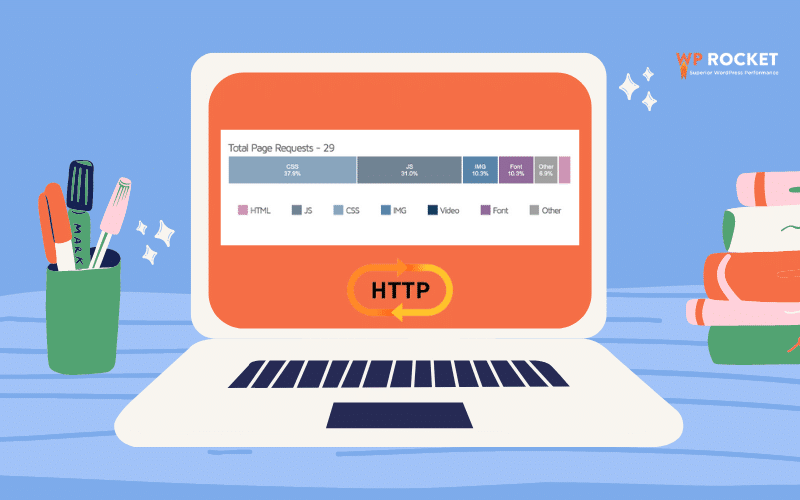
But what are HTTP requests? How many should be made per page? How many requests are you currently dealing with? Stay with us: in this article, we’ll define HTTP requests, explain why they matter, how to measure them and how to keep them low.
What Are HTTP Requests?
HTTP is a communication protocol used to deliver content and data (HTML files, CSS, images, videos, etc.) on the Internet. The World Wide Web is an expansive place with a lot of information hosted on servers, right? If you want to access this content, your browser needs to send requests and receive responses. Without the requests, there is no effective communication between you and the server.
An HTTP request can also be seen as a layer of communication between the user and the server. The message sent by the client is called HTTP (Hypertext Transfer Protocol), which helps to structure request messages effectively in three parts: request line, header, and body.
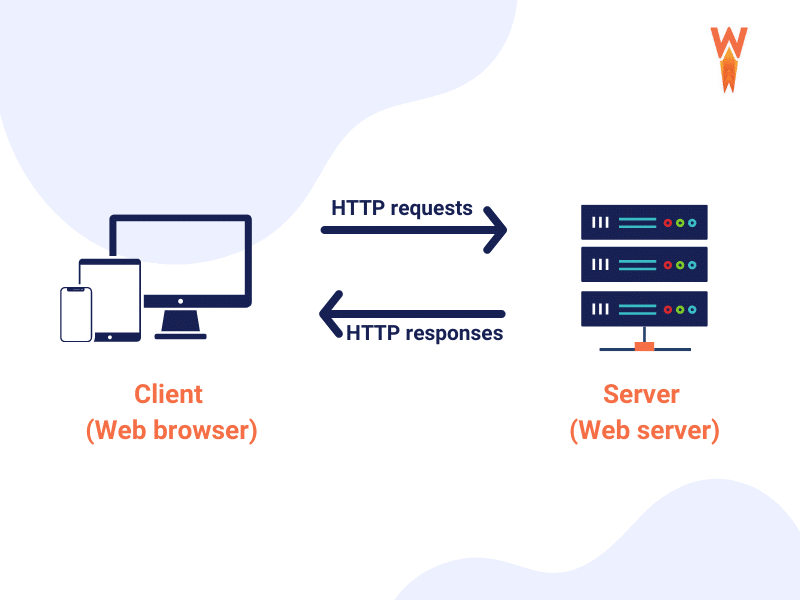
As you can see, every time you visit a site, some HTTP requests are made to display the content. Consequently, the more HTTP requests made on a page, the longer it will take to load.
You may be wondering, how many HTTP requests are “too many” HTTP requests? Let’s go over some key figures so you know where to position your WordPress site:
- Outstanding performance: getting HTTP requests below 25 per page
- Healthy performance: keeping HTTP requests under 50 per page
- Average HTTP requests on the web: 70 HTTP requests
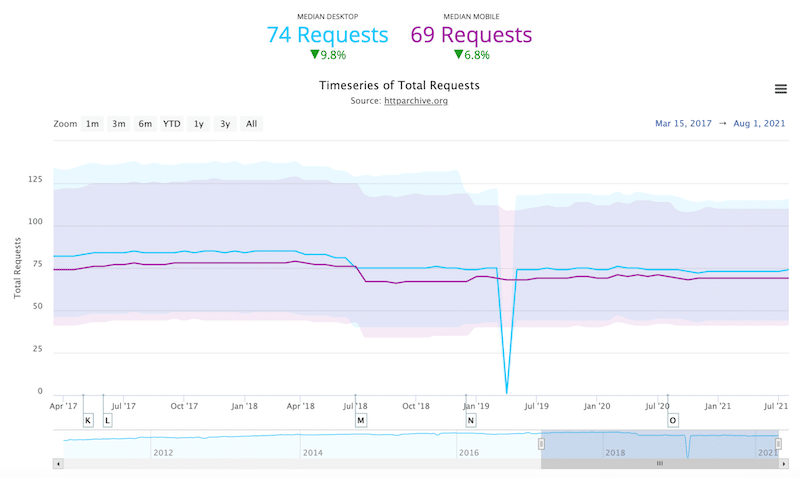
| To sum-up: ✅ HTTP requests are not all bad. ✅ Your WordPress site needs them to render the content and to look good. ✅ You don’t need as many HTTP requests as you have (keep them under 50 per page). ⚖️ It’s all about balance: have as few HTTP requests as possible without sacrificing the user experience. |
It’s important to keep your site healthy because too many HTTP requests will slow down your site. We explain why in the next section.
Why You Should Reduce HTTP Requests
You should make fewer HTTP requests to maintain great speed and performance. Yahoo said that “80% of the end-user response time is spent on the front-end”. In other words, your performance is mainly affected by images, stylesheets, and scripts, which all are rendered thanks to HTTP requests.
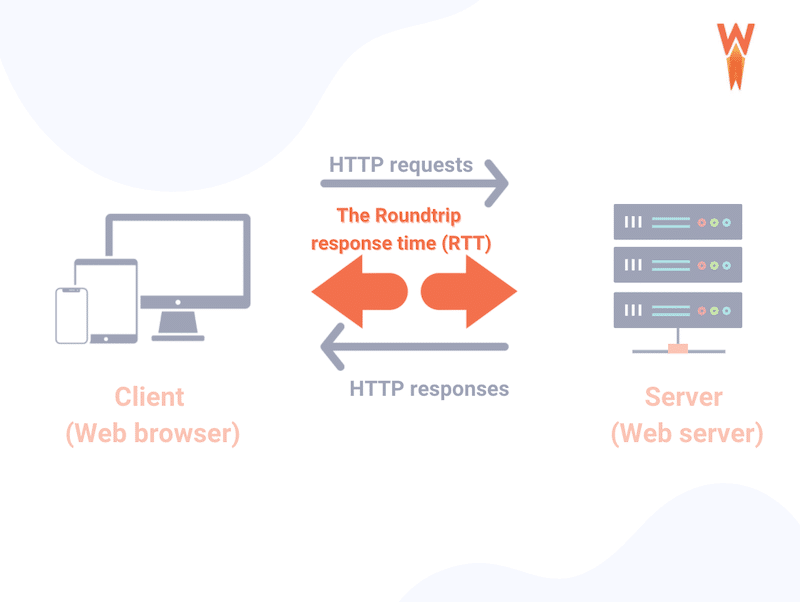
They are a key component to displaying content, but chatting back and forth between the server and the user takes time to load. This roundtrip of data is called the round-trip response time (RTT):
Another reason to make fewer HTTP requests is to keep your Core Web Vitals healthy, especially your Largest Content Paint (LCP) KPI.
LCP determines how fast the first meaningful piece of content loads. It’s all about speed-perception from the users.
| 📖 Here’s a guide you should read: How to improve your LCP score on WordPress. |
Three factors affect the LCP score of your WordPress site: slow server response times, render-blocking JavaScript and CSS, and slow resource load time. Therefore, reducing your number of HTTP requests is the key to faster pages. The fewer HTTP requests your website makes, the quicker it can load the most important content (LCP) to the user.
To sum-up:
| A lot of files on your WordPress site? → You get a lot of HTTP Requests Big and heavy files? → You get longer HTTP Requests Longer HTTP requests → Increase the actual loading time Reduce your HTTP requests → Positive impact on your LCP |
And remember, if users can access your content faster, you increase the chances of having them stay on the page and interact with your site. Interacting also means that they could be buying your products… And not only you avoid the frustration of visitors, but Google will also love your site.
That takes us to the next crucial question: how many HTTP requests is your WordPress site making?
How to Test and Measure the HTTP Requests of Your Site
There are some online tools simulating HTTP requests on your WordPress site, namely:
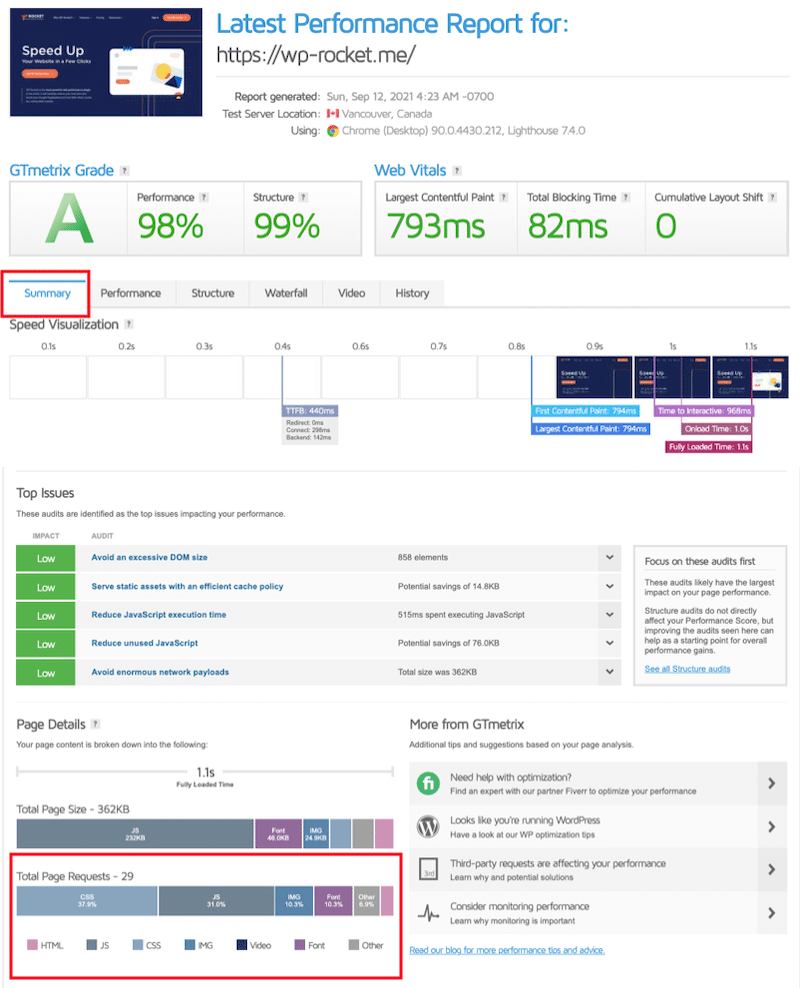
- GTmetrix (you need to have a free account to access your page details) — simply put the URL of your site, run the audit and open the “Summary” tab. Scroll down to the last section called “Page Details” to find out how many requests your page is making.
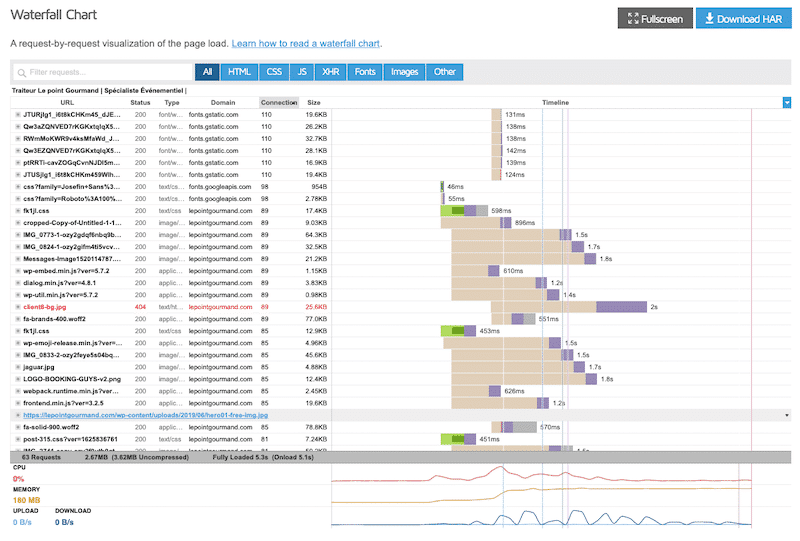
The waterfall tab is a great way to see how long individual HTTP requests take on your site:
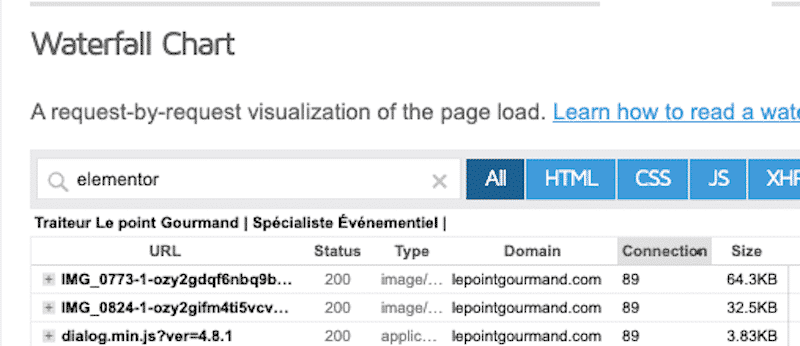
You can also look at the HTTP requests coming from a specific plugin, such as Elementor:
| 💡 GTmetrix is powered by Lighthouse technology. If you want to learn more about the Lighthouse KPIs, we have a detailed tutorial focusing on how to improve Lighthouse performance score. |
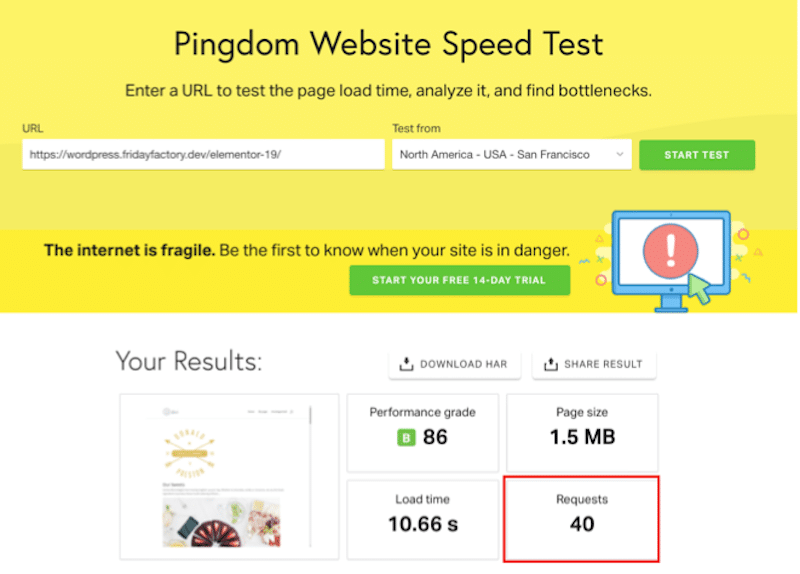
- Pingdom — simply put your URL into the box to find out how many HTTP Requests your page calls for:
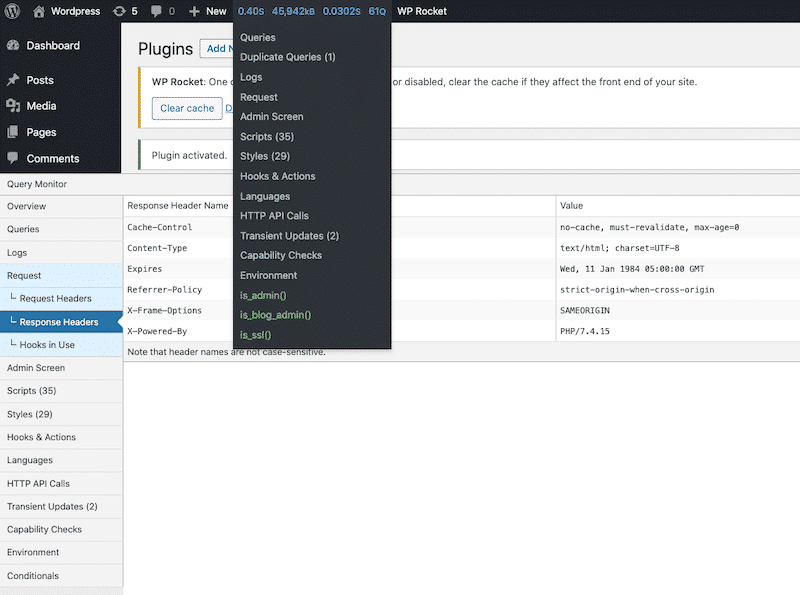
- Query Monitor — a free debugging tool to identify plugins or scripts slowing down page loads. The HTTP API Calls panel shows you information about HTTP requests performed during the page load.
10 Ways to Make Fewer HTTP Requests to Your Website (Manually and With a Plugin)
Fewer HTTP requests mean fewer bytes to download, but it can be daunting to start this optimization. Don’t worry. Thanks to our list of techniques below, you’ll be able to reduce your HTTP requests. For each tactic, we will always give two solutions: using a WordPress plugin and a manual one.
1. Combine CSS & JavaScript
Impact: High 🚀🚀🚀
An easy way to reduce HTTP requests is by combining multiple JS and CSS files.
With your WordPress theme and plugins, many CSS stylesheets and JS need to be loaded. This requires the browser to load all these resources to render web pages, meaning multiple HTTP requests.
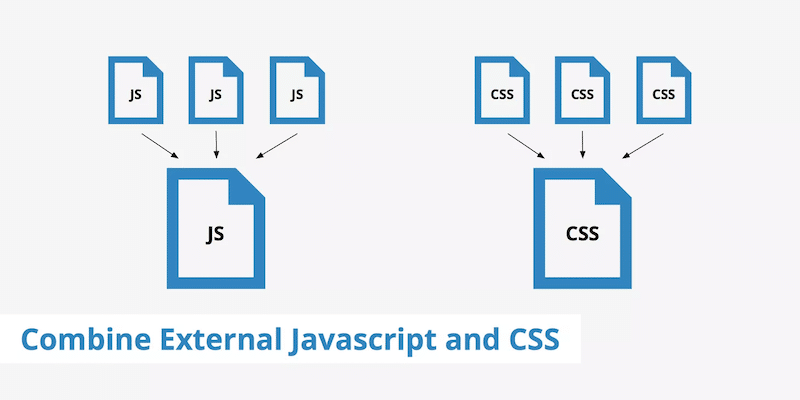
Combining CSS and JS using online tools:
- Minify — Combines multiple CSS or JavaScript files.
- Combine– PHP script combined with URL rewriting to concatenate and compress CSS and JavaScript files.
- csscompressor.net (CSS only) — Online CSS compressor, quick and free to use.
- jscompress.com (JS only) — This JavaScript compression tool allows you to combine JavaScript files into one file.
- SmartOptimizer — A PHP library that enhances your website performance by optimizing the front end using concatenation techniques.
- CSS-JS-Booster — Concatenates, minifies, and gzips CSS and JavaScript files.
- CSS Crush — Concatenates and minifies CSS files.
- csscompressor.net (CSS only) — online CSS compressor, quick and free to use.
- jscompress.com (JS only) — This JavaScript compression tool allows you to combine JavaScript files into one file.
Uploading your new combined CSS & JS files to your WordPress site:
Our goal is to put all the separate requests together into a single file.
- Simply copy/paste all of your CSS code into one main file and re-upload the file to the server (do this only if you are comfortable with your WordPress files)
- If you are using C-panel:
- Log in to your cPanel
- Go to your ‘File Manager’
- Click on the folder that contains your WordPress site
- Create a folder in your root directory with the new combined file
Combining CSS & JS files using a plugin (the quickest and safest way):
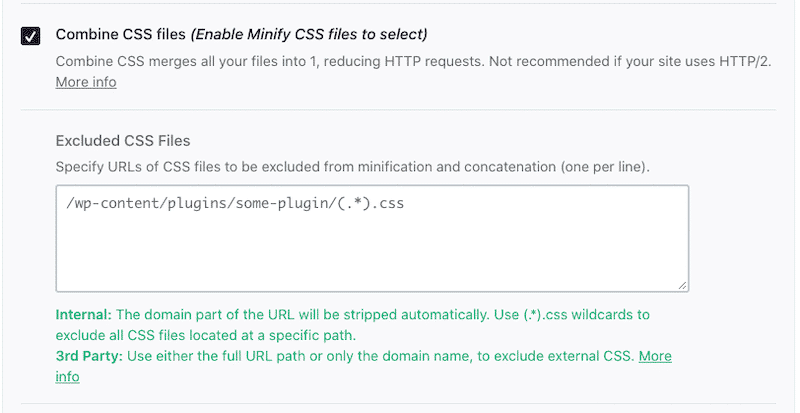
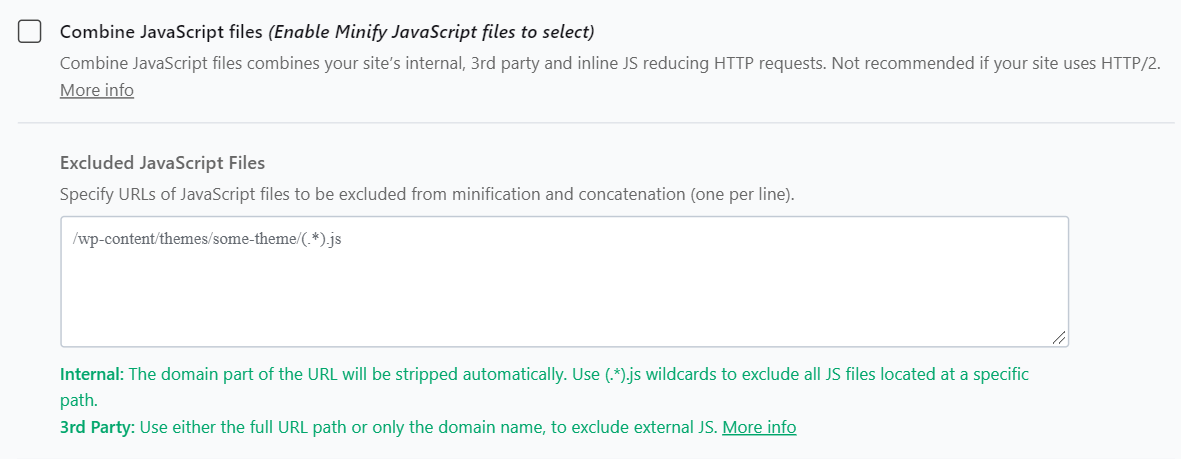
- WP Rocket: combines minified files into one file per file type (CSS or JavaScript)
- Autoptimize: helps you with the concatenation of your scripts (CSS or JavaScript).
2. Combine Images with CSS Sprites
Impact: High 🚀🚀🚀
CSS sprites are a great way to reduce the number of HTTP requests made for image resources. All CSS files on your site are render-blocking, meaning that the more CSS files are loaded, the more likely this will slow down your site.
To avoid this, you should optimize the images on your site and combine them into a single file. Once this is done, time to lean towards the CSS sprites technique: use CSS to display just a part of that image file where it’s needed. This technique improves site performance where many small images, logos, or icons are used.
You can learn more in our dedicated article on combining images using CSS sprites in WordPress.

Combining images with CSS sprites using web-based tools:
- CSS Sprite Generator, Editor, and Code
- CSSspritestool
- Go to the CSSspritestool site to combine multiple images into one using the drag-and-drop builder.
- You get a combined image file, along with some CSS code for each image that you upload.
- Upload the combined image file to your WordPress site
- Add the CSS code to your WordPress site using the Customizer
- Display each image where you want using HTML
3. Optimize Images (and Delete the Non-Important Ones)
Impact: High 🚀🚀🚀
While there is no existing WordPress plugin allowing you to specifically combine images with CSS sprites, you can still use some incredible plugins to optimize your images. Images are a must-have for the user experience, but here’s the catch: each image on your site is a separate HTTP request! Consequently, choose them wisely and consider only having images bringing value to your content.
Optimizing images means reducing their weight without compromising quality. There is no point in having a light image blurred where the content can’t even be identified, right?
Here are some resizing tools you can use:
- Photoshop
- GIMP — Free, Windows & Mac
- IrfanView — Free for Windows
- Preview for Mac — Already installed!
To optimize your images automatically, we recommend you to use a WordPress plugin:
- Imagify — by WP Media, the same company behind WP Rocket. Optimize up to 20 MB of images for free per month.
- Optimole (Image optimization & Lazy Load by Optimole)
Read our dedicated article to discover more image optimization plugins.
Note: optimizing images won’t directly reduce the number of HTTP requests, but it will reduce their size and make them load faster.
4. Enable Lazy Load on Images
Impact: High 🚀🚀🚀
Implementing “lazy load” means postponing the loading of images outside the browser viewport. In simple words, if your visitor doesn’t scroll all the way down, images placed at the end of the page won’t even be loaded. Thanks to the lazy load script, you reduce the number of HTTP requests because you only load the images above the fold.
Implementing lazy loading script manually:
First, you need to determine how you will load your images: are you using the <img> tag or CSS? Web.Dev explains very well how to implement the lazy load script for both methods. You also need to check if the element is in the viewport using the Intersection Observer API.
This is how the lazy load can look like respectively on an image and on an iframe:
<img src=”image.jpg” alt=”…” loading=”lazy”><iframe src=”video-player.html” title=”…” loading=”lazy”></iframe>
Using a lazy load plugin to apply the script automatically:
- Lazy Load by WP Rocket (Free) — displays the content only when visible to the user.
- WP Rocket — comes with the lazy load features. It’s a premium plugin that comes with many other advantages such as caching, cleaning your code, etc.)
- If you are looking for more lazy load plugins, have a look at our article.
5. Minify HTML, CSS, and JavaScript
Impact: Medium 🚀🚀
Minifying your code means removing unnecessary whitespace, comments, and extra characters from a file to make it lighter. This technique can be applied to JavaScript, CSS, and HTML files. Of course, it’s all about cleaning up the code that is not crucial for final users.
| Example of non-minified JS | Example of a minified JS |
Minifying your code manually:
Before you edit the file, download a copy from your server to save it on your computer for safekeeping.
- Minifying HTML: open your code sheet and remove comments (<!– … –>), extra spaces, line-breaks, and similar content
- Minifying CSS: remove extra spaces and comments from CSS files (/* … */) Shorten ID, class, or variable names as much as possible
- Minifying JS: remove the JS comments (//) and extra spaces from the source code. Turn arrays into objects whenever possible, optimize your conditional statements, and find answers to basic constant expressions.
Minifying your code using an online tool:
- Use a code editor like Sublime text to edit the file
- Paste your code in one of those online tools: Closure Compiler, CSS nano, JS nano, UNCSS. (We have a full list of free minifying codes for you to check out).
- Replace your old code with the new minified code and upload it back to your site
Using a WordPress plugin to minify your code:
- WP Rocket — minify your CSS and JS automatically. All you need to do is to check two boxes. WP Rocket has a dedicated section for file optimization.


6. Replace Heavy Plugins with Lightweight Ones
Impact: Medium 🚀🚀
Your site’s slow loading speeds could result from one or two plugins that are overworking your WordPress site with too many HTTP requests. For classifying a plugin as lightweight, you should look at: code quality & professionalism, the features, how efficiently the code executes them, and the file size.
How to flag the slow plugins of your WordPress site?
Let’s say you are hesitating between two contact forms plugins (A and B). Use our 5 steps to run your diagnosis:
- Run a performance test using Pingdom to check your number of HTTP requests — write down your score
- Activate plugin A and run your test again- write down your score
- Deactivate plugin A and install plugin B to do the same audit
- Compare how many HTTP requests have been added for each plugin
- Choose the one with fewer HTTP requests and delete the slow one!
Using a plugin to identify which plugins are slowing down your site with too many HTTP requests:
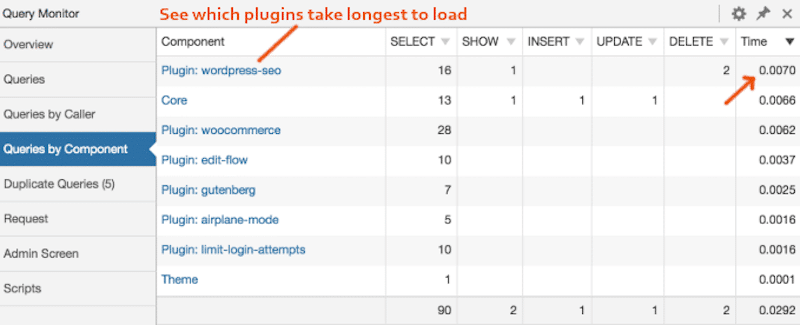
- The Query Monitor plugin can be used to identify which plugins are harming your site and help you remove them
7. Load Scripts Only When Needed (and Only on Specific Pages)
Impact: Medium 🚀🚀
Another way to make fewer HTTP requests is to selectively disable scripts and plugins from specific pages/posts that don’t need to load.
Use a WordPress plugin to load script only when needed:
- Perfmatters — allows you to disable a script on a page or post.
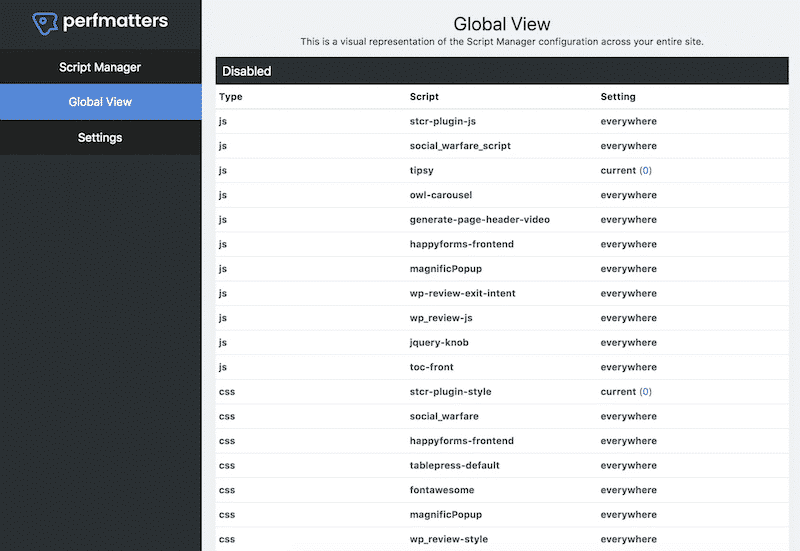
- Asset Cleanup Pro — which is a bit less user-friendly but does the job too.

8. Reduce External Scripts / HTTP Requests
Impact: Medium 🚀🚀
Loading every third-party script is an extra HTTP request that the browser makes, slowing down page performance (here’s how you can reduce the impact of third-party scripts). Keeping track of all your third-party integrations is crucial to understanding which external assets slow down your site speed. We have been explaining how to reduce your HTTP requests. Let’s not be impacted by the external ones, right?
Too many HTTP requests will often force resources to be fetched from the network, and we don’t want this for our performance.
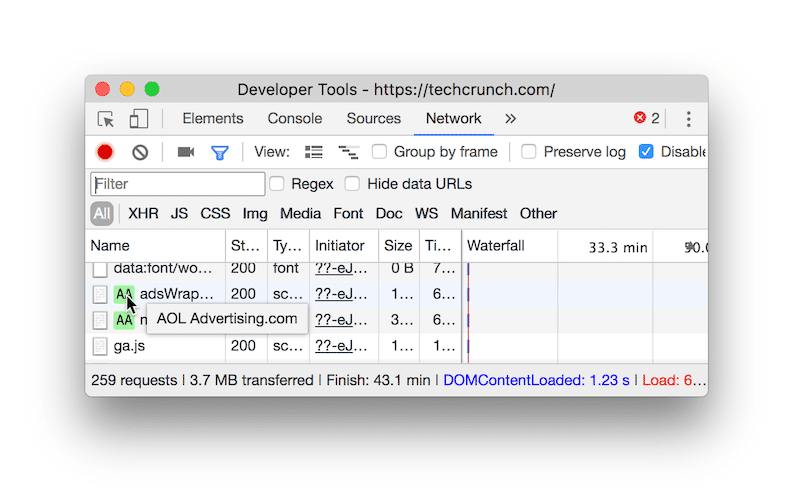
External scripts mainly come from Google Analytics tags, Facebook Pixels, YouTube videos, social sharing buttons, and A/B testing tags. Identifying all files that are adding requests is highly recommended.
Using tools to identify the heaviest external scripts:
- Performance tools like These Chrome DevTools, PageSpeed Insights, and WebPageTest can help you identify them.
Optimizing the third party requests manually:
Now that you have identified which external scripts affect performance, you can use the async or defer attribute on them:
<script async src=“script.js”> <script defer src=“script.js”>
If you want to learn more about using both attributes, we recommend reading Web.Dev, which lists all the steps to efficiently load third-party JS.
Using a plugin to reduce your external scripts impact on performance:
- WP Rocket help you reduce the impact of third-party code in many ways:
- Hosting Google Analytics files and tags locally.
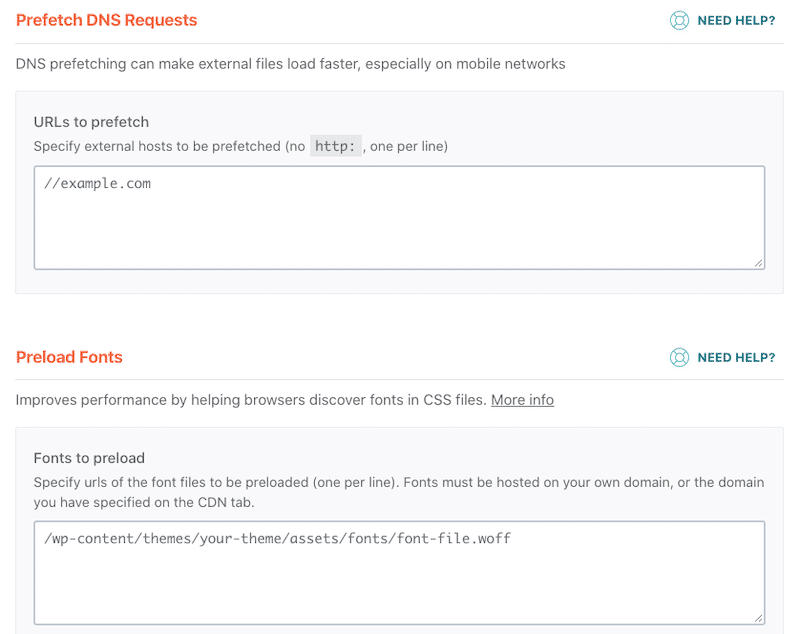
- Prefetching DNS requests, meaning that external files will load faster.
- Preloading fonts to help browsers discover Google fonts faster in your CSS files.
- Deferring your third-party JS such as ads and analytics, just tell your browser what he should load first.
For the story, Telegraph recently deferred all of their scripts and improved the ad charging time by an average of four seconds.
9. Use a CDN
Impact: Medium 🚀🚀
A Content Delivery Network (CDN) refers to geographically distributed servers that serve content from the closest location possible. No matter where a user is, they can access your site’s contents quickly and efficiently. Every HTTP request made by them will be served from the nearest location possible.
Best CDNs available on the market:
We also wrote a guide to help you choose the right CDN for you.
10. Defer Render-Blocking JavaScript and CSS
Impact: Medium 🚀🚀
Is this resource very useful, or is it OK to load it later? The immediate need to use the resource will determine if the resource is render-blocking or not. To eliminate render-blocking JavaScript and CSS, you need to use the defer option or the async option.
Manually removing the render-blocking resources:
First, run an audit on Google PageSpeed Insights and check your opportunities section. If you have a section “Eliminate render-blocking resources”, then you probably need to do something just like in our example below:
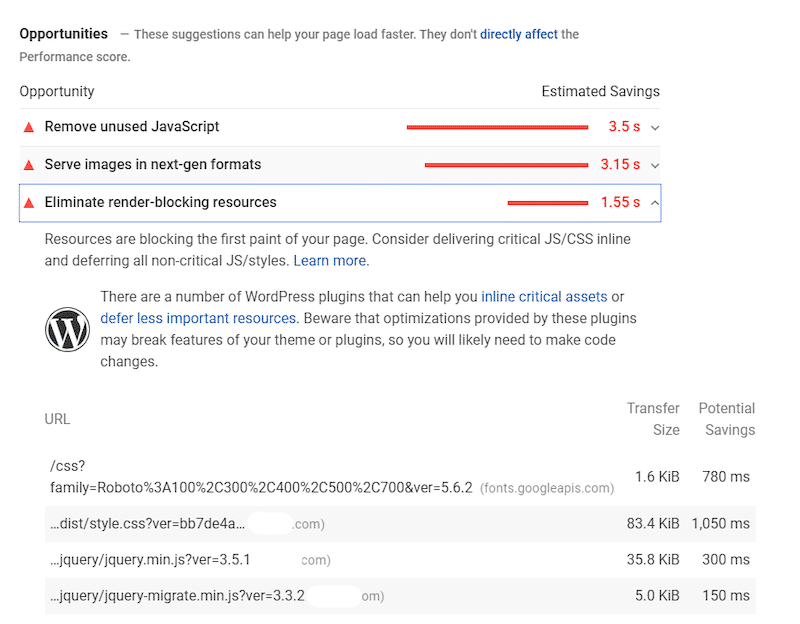
To eliminate this issue manually, you need to use the defer and async attributes.
Here’s an example of the defer attribute to defer JS:
<script defer src=”/example-js-script”></script>
Follow our in-depth tutorial explaining how to eliminate render-blocking resources using both scripts manually.
If you want something more straightforward, simply use a WordPress plugin.
Using a WordPress plugin to defer JS and CSS:
- WP Rocket — which helps you with deferring your JS files in the simplest way. The plugin also offers the “Optimize CSS delivery” feature that constitutes the render-blocking resources. You can also exclude any JS or CSS file from being deferred if you need it.


| 💡 Fixing your HTTP requests is an excellent start to speed up your WordPress site. However, “reducing HTTP requests” is not the only performance optimization you should focus on. If you want your site at lightning speed, follow our complete guide about page speed optimization. |
How to Reduce HTTP Requests with a Plugin
A plugin like WP Rocket helps to reduce HTTP requests and to speed up your site significantly. Let’s run a performance audit of a WordPress site with and without WP Rocket. You’ll see after the comparison that it’s one of the best caching plugins for WordPress.
| 📖 If you are fairly new to this topic or have never run a performance audit before, check our detailed guide related to testing your WordPress site’s performance and speed. |
We will use GTmetrix to measure the following KPIs:
- Overall performance grade (A to F)
- Core Web Vitals scores (LCP, CLS, and FID) + TTI and TBT (Note: if FID is not available, we will measure FCP)
- Number of HTTP requests (Total page requests)
In terms of content, my WordPress site contains some text, a few social media icons, 8 images, an embedded video from YouTube, a map with a pin (from Google Maps), and 3 testimonials from clients with their photos.

Scenario 1 — Measuring Performance and HTTP Requests – No WP Rocket
Let’s have a look at the performance results using GTmetrix. They are not very encouraging, and I got an “E” for my overall performance grade:
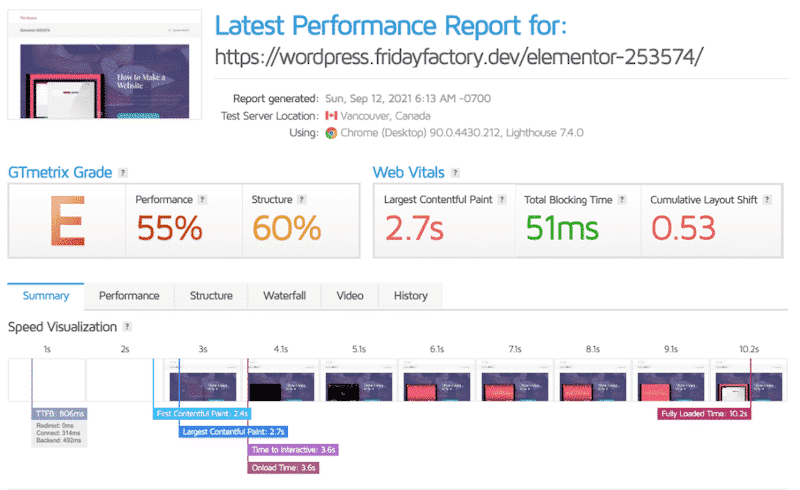
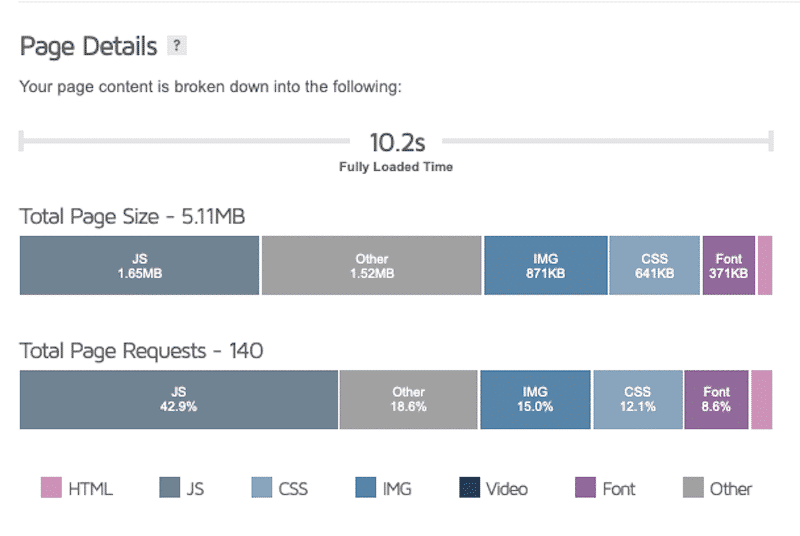
We notice that my page is making 140 HTTP requests and that 42.9% of them are due to JS. It takes 10.2s for my page to be fully loaded, and the size of the page is 5.11 MB.
| KPIs | Score (No WP Rocket) |
| GTmetrix Overall Grade | E |
| Performance | 55% |
| Largest Contentful Paint (LCP) | 2.7s |
| First Contentful Paint (FCP) | 2.4s |
| Cumulative Layout Shift (CLS) | 0.53 ms |
| Time to Interactive (TTI) | 3.6s |
| Total Blocking Time (TBT) | 51ms |
| Time To First Byte (TTFB) | 806 ms |
| Fully Loaded Time | 10.2s |
| Page Size | 5.11 MB |
| Total Page Requests | 140 (Best-in-class score: < 50) |
The main recommendations from GTmetrix are the following:
- Efficiently load third-party JS (defer JS, establish early connections to the required origins and apply lazy-load on embedded third-party resources)
- Eliminate render-blocking resources (Consider delivering critical CSS and JS inline and deferring all non-critical JS/styles. Learn more about what critical CSS is in our article)
- Optimize my code (combine and minify JS and CSS / optimize CSS delivery)
- Implement page caching
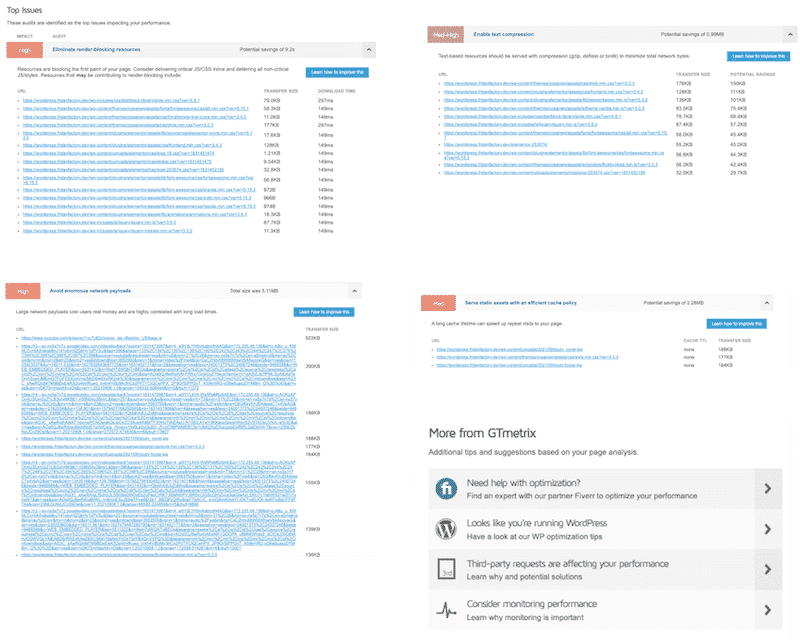
Guess what? This is exactly what WP Rocket can do for your WordPress site (amongst other things). In scenario 2, we will activate WP Rocket and check our website’s health again. Good things are coming.
Scenario 2 — Measuring Performance and HTTP Requests — 🚀 With WP Rocket
Now that WP Rocket is activated let’s run another performance audit using the same page.
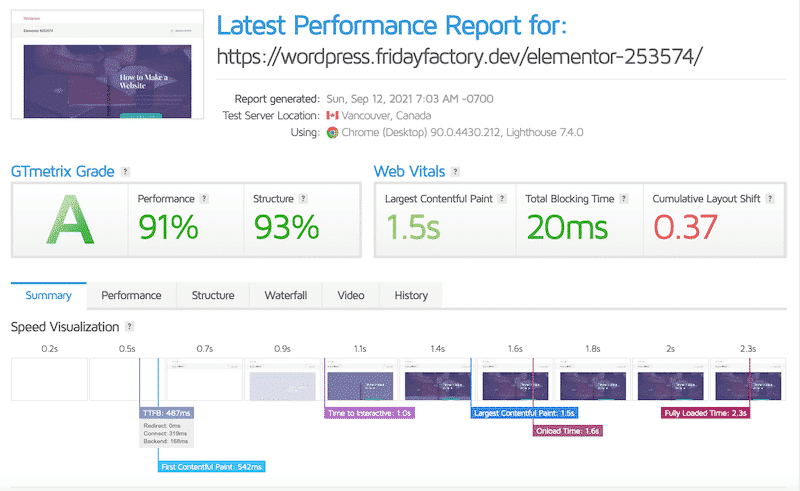
This time, the results are very encouraging, and we went from “E” to “A” regarding my overall performance grade:
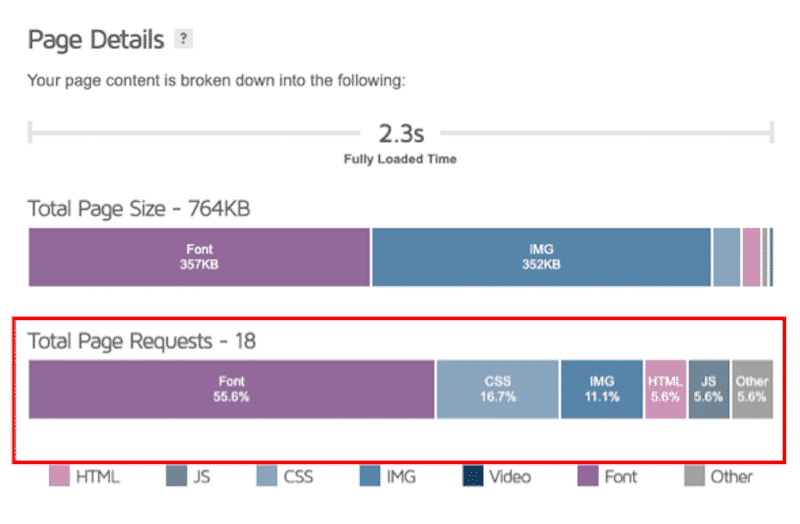
Another impressive progress is the number of my HTTP requests that dropped from 140 to 18 upon activation of WP Rocket (-87%).
Globally speaking, all my KPIs are better, and my website is much faster when using WP Rocket:
| KPIs | Score — No WP Rocket | Score 🚀 With WP Rocket |
| GTmetrix Overall Grade | E | A |
| Performance | 55% | 91% |
| Largest Contentful Paint (LCP) | 2.7s | 1.5s |
| First Contentful Paint (FCP) | 2.4s | 542 ms |
| Cumulative Layout Shift (CLS) | 0.53 ms | 0.37 ms |
| Time to Interactive (TTI) | 3.6s | 1 s |
| Total Blocking Time (TBT) | 51ms | 20 ms |
| Time To First Byte (TTFB) | 806 ms | 487 ms |
| Fully Loaded Time | 10.2s | 2.3s |
| Page Size | 5.11 MB | 604 KB |
| Total Page Requests | 140 (Best-in-class score: < 50) | 18 (Best-in-class score: < 50) |
Our performance has globally improved with the WP Rocket cache plugin activated.
WP Rocket automatically applied almost all the techniques listed in the section “How to Make Fewer HTTP Requests to Your Website“.
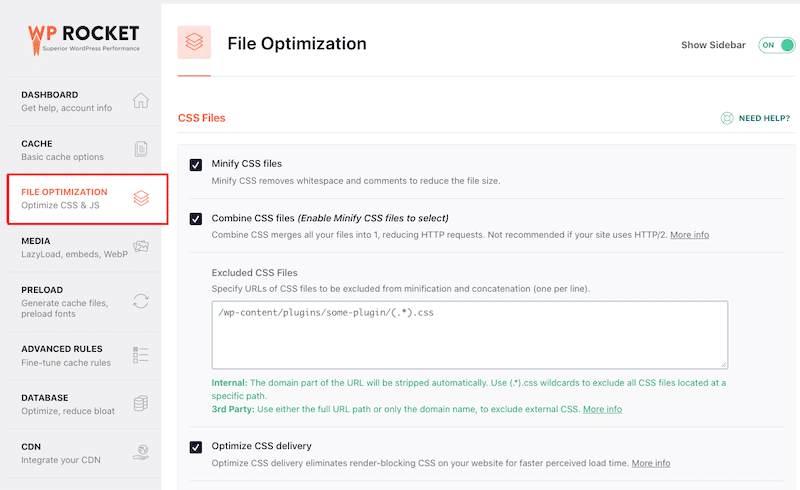
From the WP Rocket’s dashboard, you can see that my CSS code has been minified, combined, and optimized:
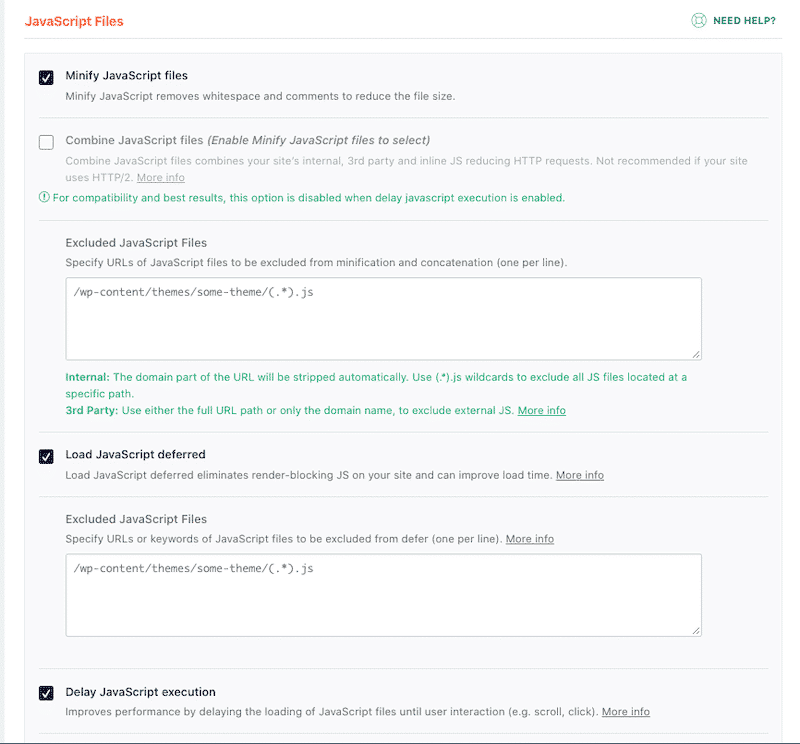
The same optimization has automatically been applied to my JS:
Wrapping Up
WP Rocket helped to reduce HTTP requests of my WordPress site by 87%. In our case study, we saw that our requests went from 140 to 18 simply upon activation of the plugin. You do save time and effort!
| Without WP Rocket | 🚀 With WP Rocket |
| 140 HTTP Requests | 18 HTTP Requests (-87%) |
To maintain a great performance of your site, it’s recommended to maintain the HTTP requests under 50. WP Rocket is a great automatic tool to never go over that number! It will boost performance by reducing and eliminating unnecessary HTTP requests — without any technical knowledge required on your part.
Work less and get better performance results thanks to WP Rocket today! We do have a 14-day money-back guarantee: if you are not satisfied, we refund you. Come on, give it a try and tell us how your HTTP requests are doing in the comments.


